physics_joint_wheel_create(inst1, inst2, anchor_x, anchor_y, axis_x, axis_y, enableMotor, max_motor_torque, motor_speed, freq_hz, damping_ratio, col)
| 参数 | 描述 |
|---|---|
| inst1 | The first instance to connect with the joint |
| inst2 | The second instance to connect with the joint |
| anchor_x | The x coordinate where the joint is anchored, within the game world |
| anchor_y | The y coordinate where the joint is anchored, within the game world |
| axis_x | The x component of the wheel axis vector |
| axis_y | The y component of the wheel axis vector |
| enableMotor | Whether the motor should be active (true) or not (false) |
| max_motor_torque | Sets the maximum motor torque used to achieve the desired motor speed (in Newtons per meter) |
| motor_speed | This is the speed at which the motor should rotate |
| freq_hz | This is the oscillation frequency for the joint, in hertz |
| damping_ratio | This damping ratio for the joint |
| col | Whether the two instances can collide (true) or not (false) |
Returns: index of the joint
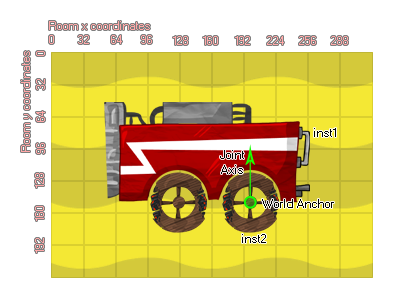
A wheel joint simply combines a piston and a revolute joint, like a wheel mounted on the shock absorber of a car. You specify the anchor point for the joint well as the two physics enabled instances to joint, and the first instance will act as the "body" for the joint, while the second will be the "wheel", and be permitted to move freely around the joint axis. You can also set an axis vector, which is the imaginary line along which the joint will act as a "spring" permitting the wheel to bounce up and down along it as it encounters obstacles (much like the piston joint). 下面的图像说明这一点:
If you choose to enable a motor, then the second instance will rotate around the anchor position, and you can set the maximum motor torque used to achieve the desired motor speed (N/m) as well as the speed at which the motor should turn. Since the wheel joint also has an axis along which it may move, you can set the oscillation frequency (in Hz) as well as the damping ratio for the joint - you may need to play with these values to fine tune them and it is recommended that you start off with smaller values and increment them until you get the effect that you desire.
As with all the joints, if you set the "col" value to true then the two instances can interact and collide with each other but only if they have collision events, however if it is set to false, they will not collide no matter what.
var mainFixture = physics_fixture_create();
physics_fixture_set_box_shape(mainFixture, 128, 32);
var wheelFixture = physics_fixture_create();
physics_fixture_set_circle_shape(wheelFixture, 32);
var o_id = instance_create_layer(x+25, y + 100, "Instances",
obj_Wheel);
physics_fixture_bind(mainFixture, id);
physics_fixture_bind(wheelFixture, o_id);
physics_joint_wheel_create(id, o_id, o_id.x, o_id.y, 0, 1, true,
10, 1, 15, 6, false);
physics_fixture_delete(mainFixture);
physics_fixture_delete(wheelFixture);
The above code creates and defines two new fixtures. These are then bound to the calling instance and a new instance that is created before having a wheel joint applied to connect them, after which the fixtures are deleted from memory.